
In this blog, I’m going to show you how to build a flow I use all the time. The scenario is inside sales or customer support reps want to get to the right records or take the right actions quickly. The best way to do that in Salesforce is with a flow.
In this example, the flow will pull up the customer’s orders, the company’s products, be able to create a new quote (and associated opportunity), and create a case. All without having to jump around.
When it is finished, it’ll look like this for the user:
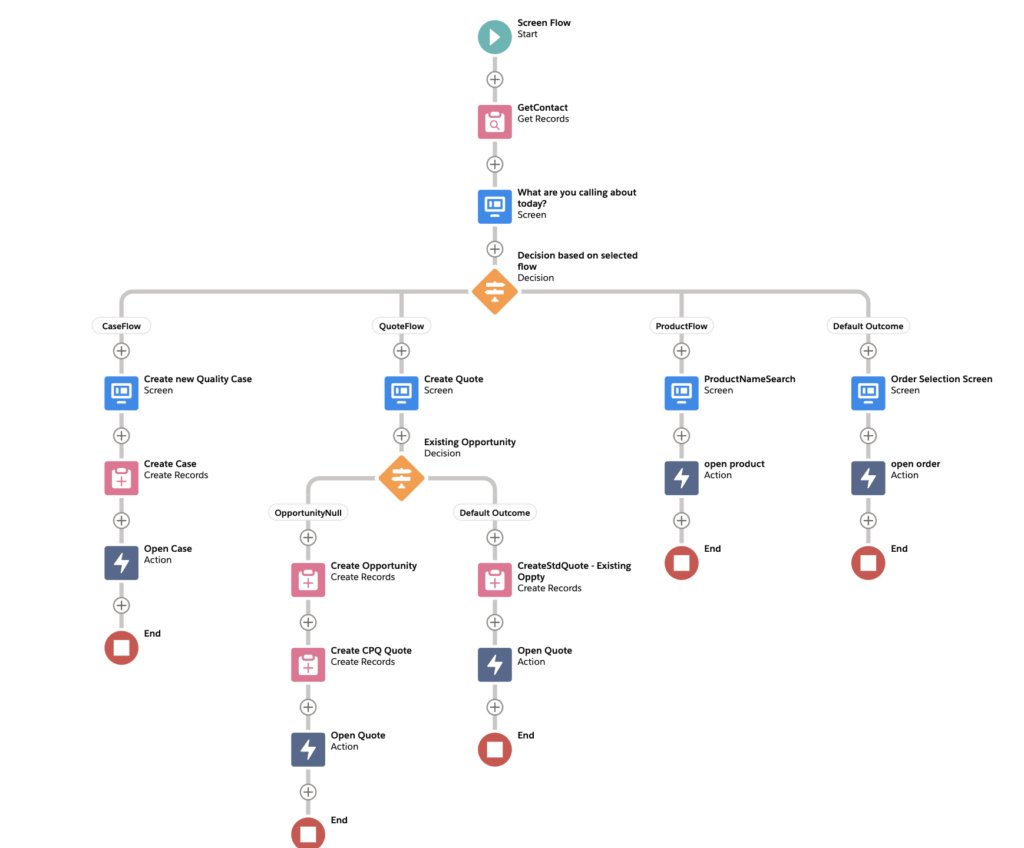
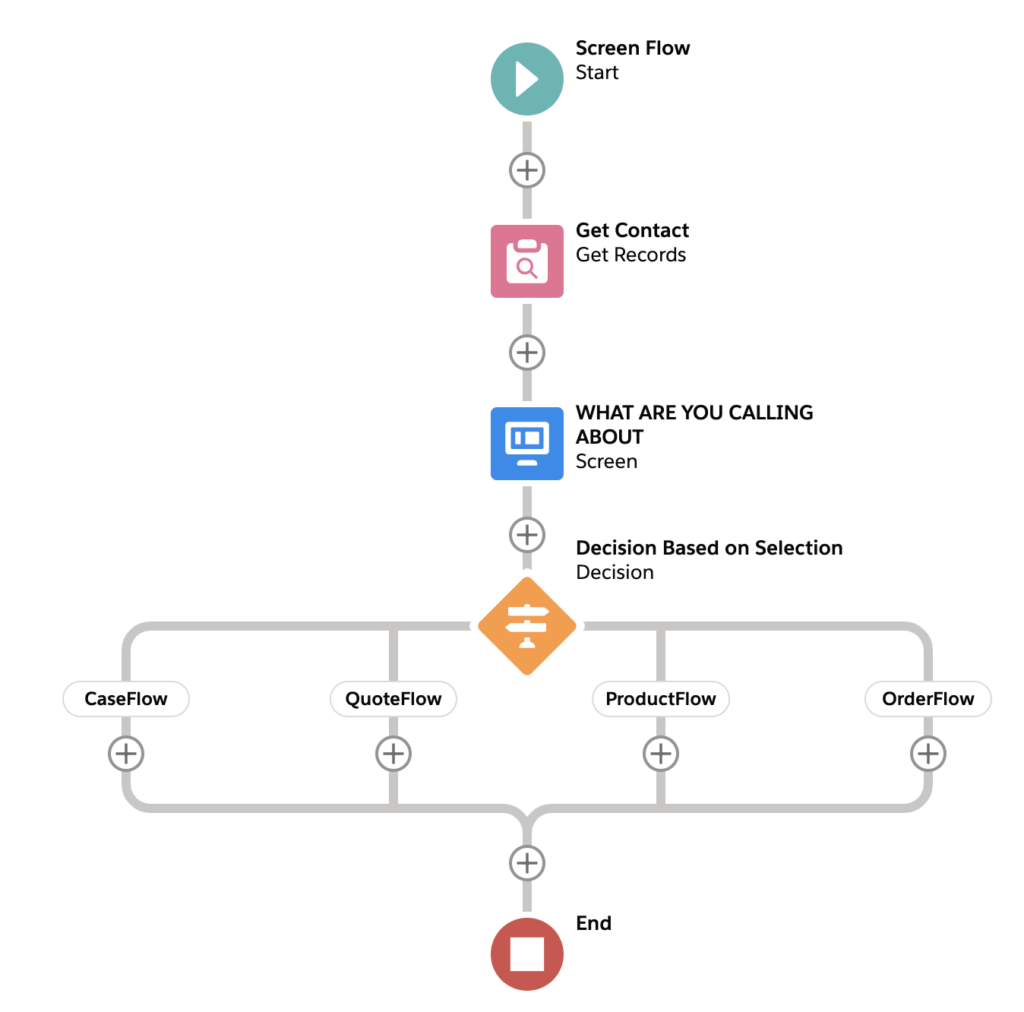
And the flow will look like this on the backend.
Full disclosure, I did not build this originally; my colleague Joe Grace built this gem well over a year ago, but he gave me his blessing to write this up.
Let’s begin.
Create a New Flow
This flow will run on the Contact object, so if you want this to work on another object, adjust as necessary.
This post may seem intimidating in length and detail, but fret not. A lot of it is similar in nature, so when it makes sense to say “rinse, lather, and repeat” I’ll let you know.
Create a new flow and select Screen Flow.
Personally, I liked auto-layout and that’s what I’ll be showing in this walk through.
Get Contact Records
The first thing we’ll do is get the records for the contact this flow runs on.
On the canvas, click the + sign and Add a Get Records element. Select Contact and Set the Filter Contact Records to be ID equals recordID.
What?! RecordID isn’t there? That’s because RecordID is a variable and we need to create it. This will allow us to pass in the record ID from the contact to the flow and filter everything accordingly.
In the Value box, click and select New Resource. Then set Resource Type to Variable, API name to recordID, data type to Text, and most importantly make this available for input. If you do not have that last part, the flow will fail.
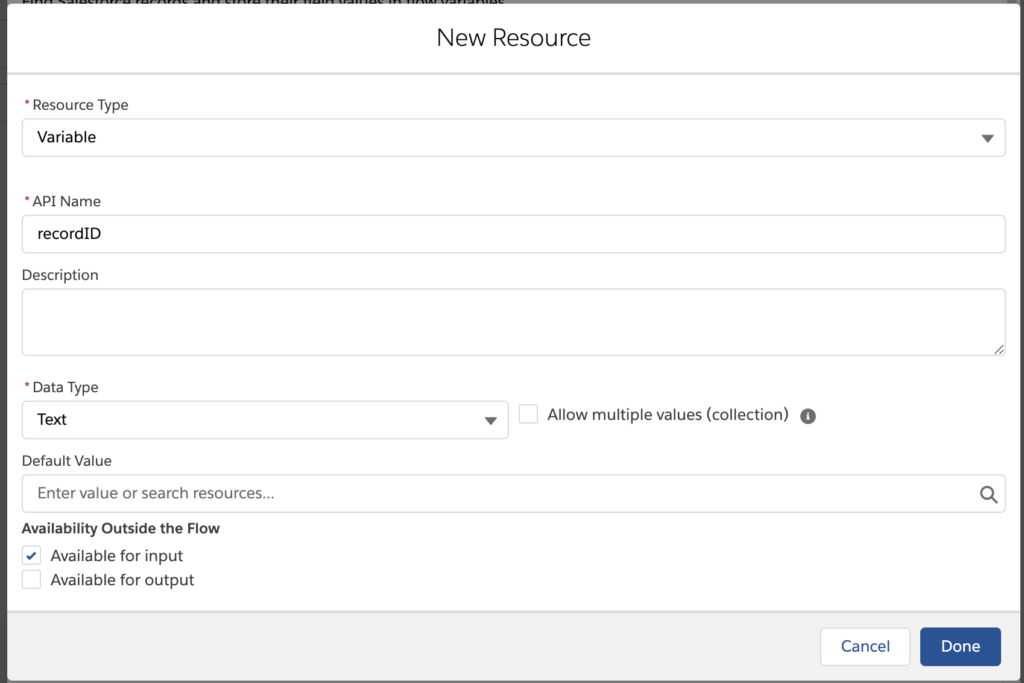
When done, make sure that the value is set to recordID.
Scroll down a bit and select Only the first record. In the How to Store Record Data, we’re going to choose the fields here. This is really up to you. In this flow, we’re just storing one variable so selecting the fields feels a little more nimble than grabbing the kitchen sink.
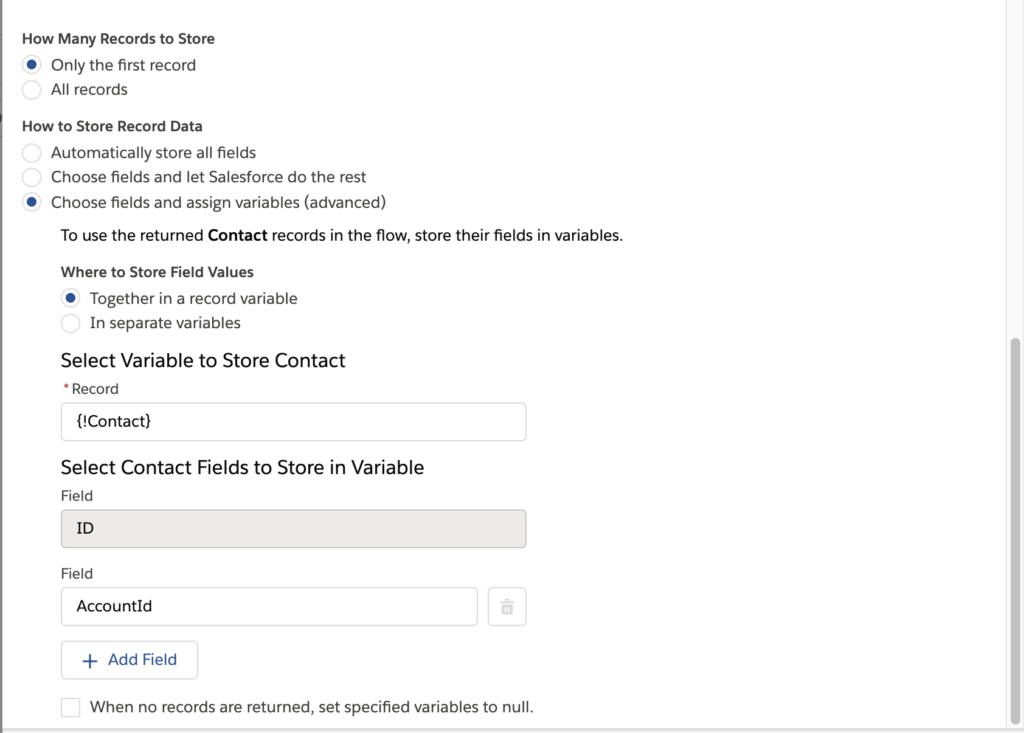
Create a new variable named Contact. Set the data type to Record and the object to Contact. When done, in the section Select Contact Fields to Store in Variable, select AccountID.
Click Done.
Congrats! – we now can get records in context of the user.
The Screen
The screen, specifically the first page, is like mission control for this flow. Or maybe it’s more like that Robert Frost poem: which path in the flow will you take?
On your flow canvas, add a screen.
Drag a display text component on the page, and enter the text, “What can I help you with today?” and style it as necessary in the right-hand pane. Be sure to give it an API name too.

Then click the name or header of the flow, and in the properties uncheck Show Header. This way you get some more real estate.
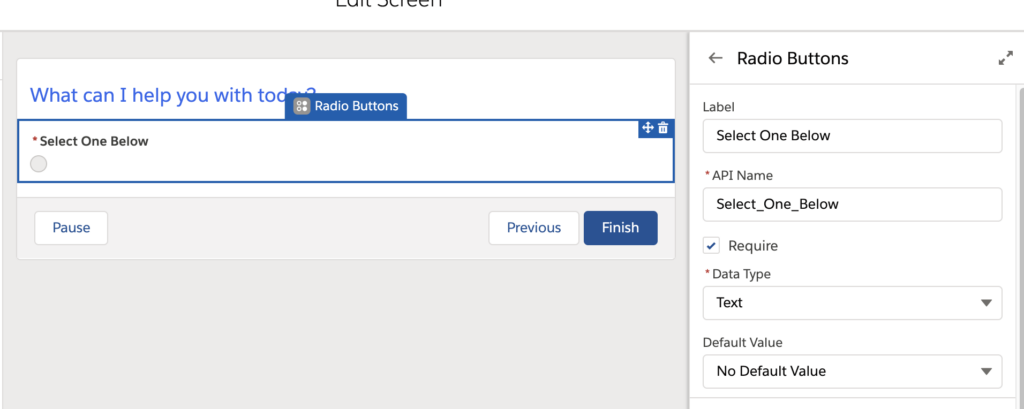
Now we’re going to add the buttons that’ll take the user to the right place. Drag the radio button component onto the canvas. In the properties, set the name to Select One Below, and require it. Remember this name, as we’ll need it in the next section.
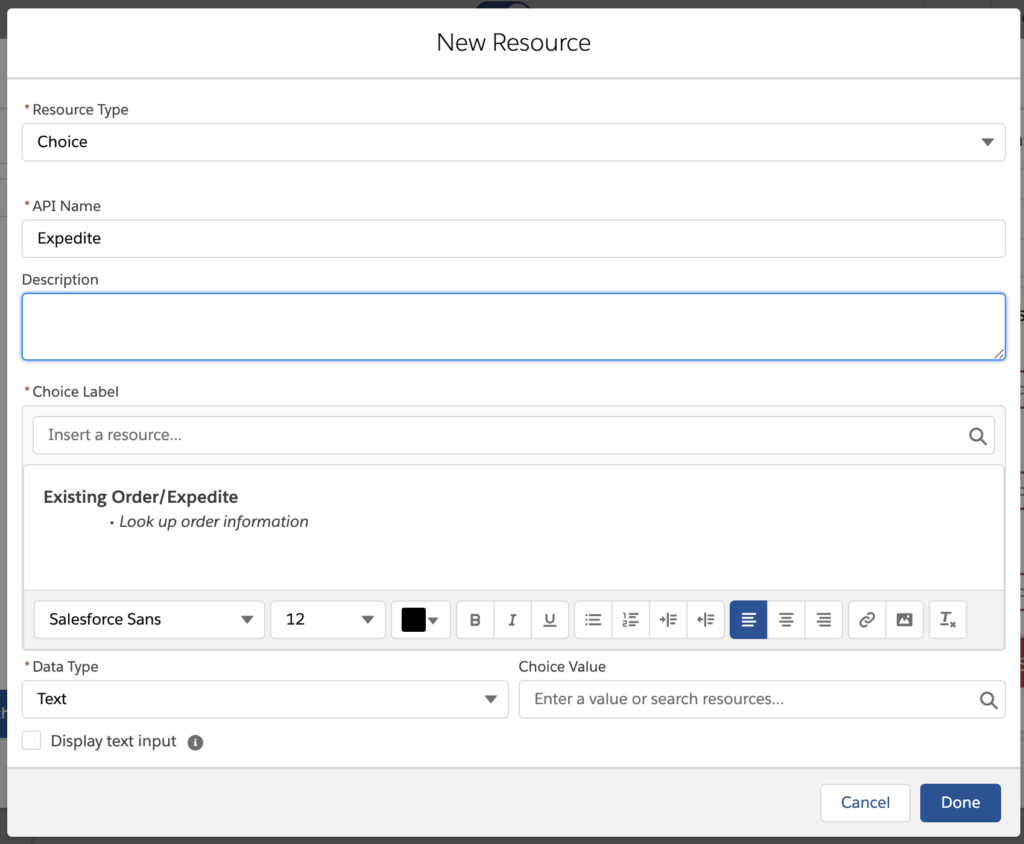
In the Select Choices section, add 3 additional choices. We’ll be creating four variables total; all of them choice. They are as follows: Expedite, Product Information, Quote, and Quality.
Here’s how you set up the first choice. Rinse, lather, and repeat for your other variables.
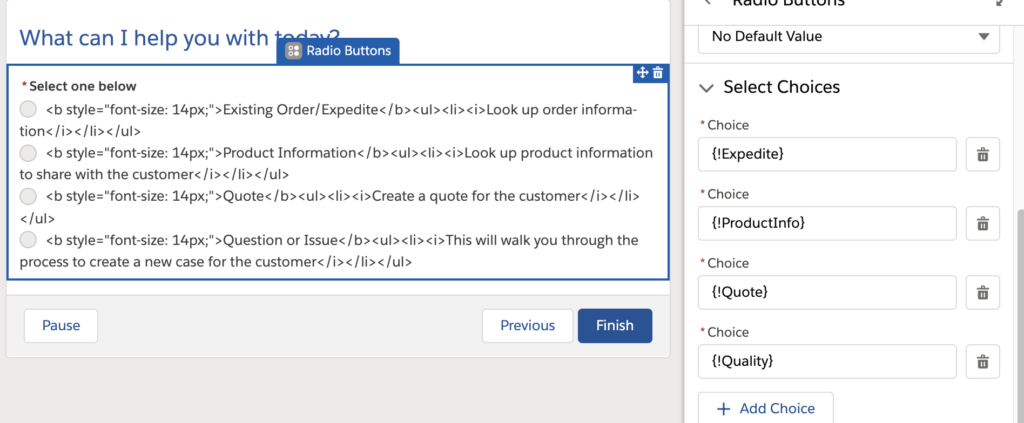
When done, enter the variable names in the choices on the screen.
Any rich text will now populate next to the radio buttons on the screen. Look ma, no HTML skills necessary!
Decision Time
Our flow has a lot of variables, but yet only two elements: get contact and the home screen. Now we need to add a decision tree so that we can take the user to the relevant next screen.
On the canvas, click Add Element and select Decision.
Give it a name like “Decision Based on Selection.”
What we’re going to now create three outcomes, and define the default outcome, which will give us the four outcomes to match the radio button selections.
Create an outcome called “CaseFlow” and set the condition as follows.
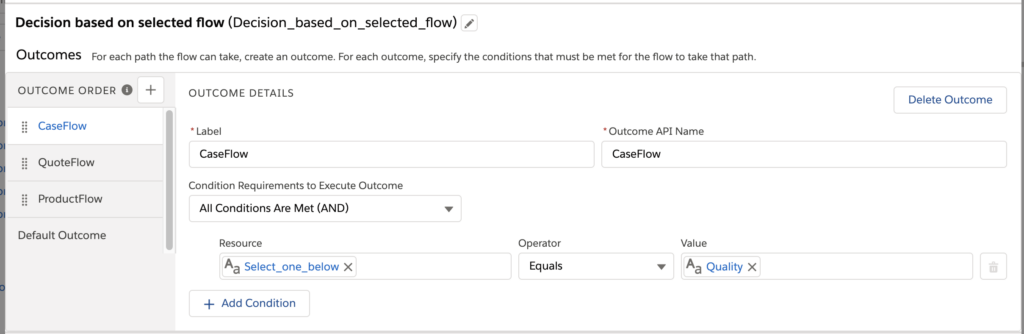
Repeat this step for the Quote and Product outcomes. You can leave default outcome as default outcome, or you can rename it to OrderFlow. Depends on how much of a stickler you are for naming conventions.
Your flow should now look like a four pronged fork.
Order and Product Flow
I’m going to start with these two branches as they are nearly identical. In these branches, we’ll select an order and a product respectively and then open the record
First, create a new text variable named OrderID.
In the order flow, add a new screen element and call it Order Selection Screen. Hide the header again.
Drag a radio button on the screen. Name it “Select an Order.”
In the choice option, create a new resource. This time, it’ll be a record choice set. Why that and not a variable? This time we’re going to query records based on information we’ve gathered in the flow.
Name your resource OrderList. Filter it so we only get orders for the account the contact works at. You can obviously change this based on your requirements.
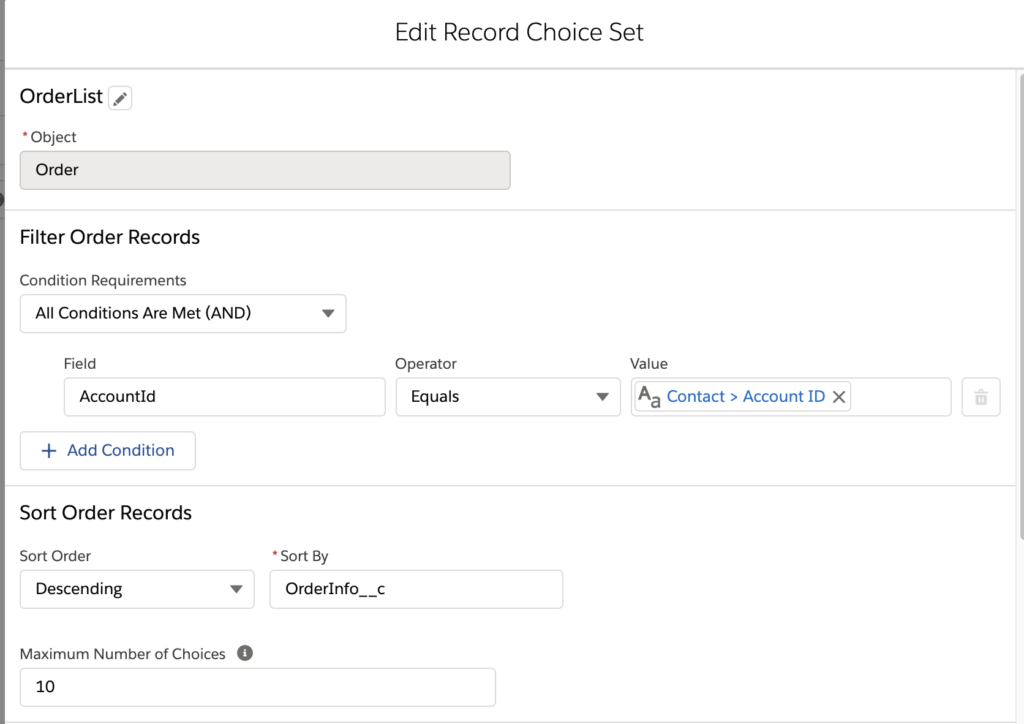
We’re only going to return 10 orders for usability’s sake and filter by OrderInfo__c. Then later on set the Configure Each Choice part to be OrderInfo__c.
Once you pick an order, we need to store the ID so we can open it. In Store More Order Field Values, set the field to ID. Then set the variable to OrderID – the variable we created at the beginning of this part.
Now your radio button will look like this.
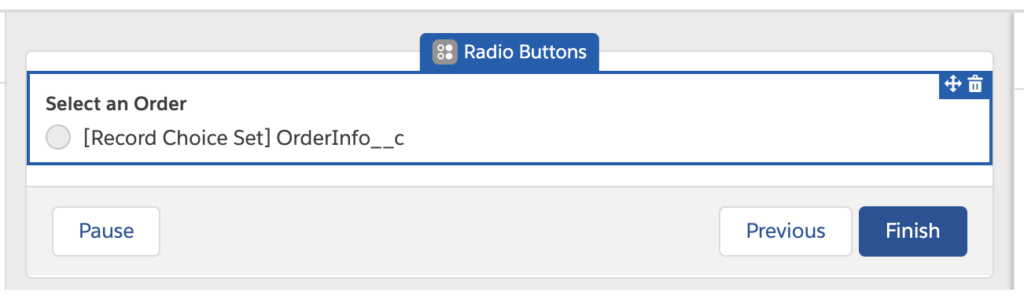
Don’t let this fool you. There may only be one button now, but there are many records that’ll be populated here when the flow runs.
After the screen element in this branch, add an Action element. This is how we’ll open the record.
In the search bar, look for openSObject.
In label, enter Open Order and in the Set Input Values section, enter OrderID. This will will take you to the record, in this case the order, you select from the radio button.
Now you can repeat the same steps for the product branch and update the names accordingly. There’s a difference though. To show all products, when creating a record choice, set the condition requirements to “None-Get All Product Records.”
Additionally, since your org may have dozens or thousands of products, you may want a drop down instead of radio buttons, or you can limit the results you return.
Case Flow
In this branch, instead of finding records, we’re going to create a new one, and in turn, take you right to it.
In the case flow, add a screen element. Drag two text components onto the screen.
Name one “Case Subject” and make it required, and the other one “Additional Information.” This will be for the case subject and description respectively.
Back on the flow canvas, add a new create record element. Name it “Create Case.” We’re creating one case, and set the record fields to be separate resources and literal values.
Map the fields as follows below. We’re taking some things we gathered when the flow started and using them here (i.e. Account and Contact ID), and the fields we just created on the screen.

When done mapping the fields, store the Case ID in the variable CaseID.
Then add an action element, name it Open Case and in the Set Input Values section, enter CaseID.
Three branches down, one to go!
Quote Flow
This flow is different than the rest because there’s logic to allow you to creating two records AT THE SAME DAMN TIME! Well not the same time because then we’d have a race condition, but two records in THE SAME DAMN FLOW BRANCH.
Your experience may vary as the org I’m building this has CPQ.
Ok, so let’s begin.
In your quote flow branch, add a screen. Name it “Create Quote.“ Add a date field and a text field to the screen and name them ”Expires On“ and ”Quote Name“ respectively and make both required.
Now on this screen we want the ability to associate a quote to an opportunity. Later in this flow, we’ll create a new opportunity if one does not exists.
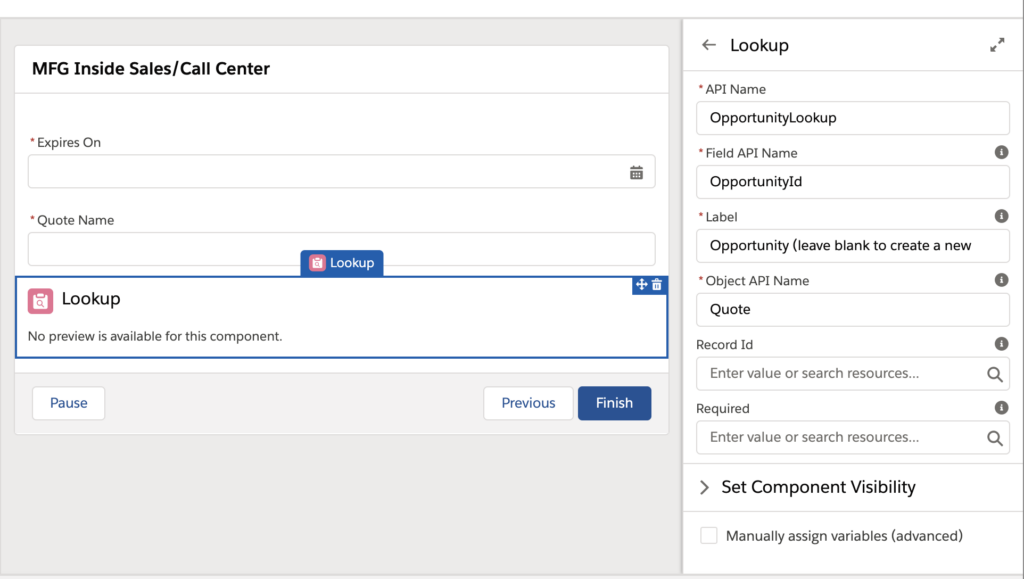
To make this happen, add a lookup screen component to the screen. Give it a nice name like OpportunityLookup.
In Field API Name, enter OpportunityID. This is not a resource, it’s just the text OpportunityId. In Label you can put in whatever you like. I recommend “Opportunity (leave blank to create a new one).” Lastly, in Object API Name, enter Quote.
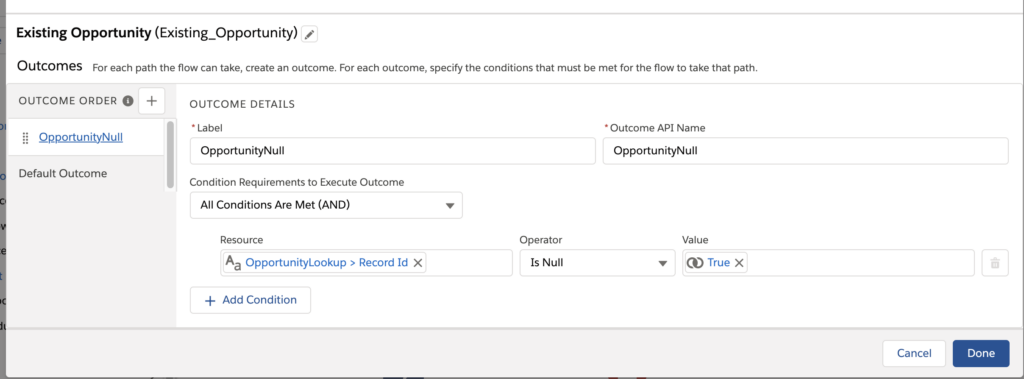
Now we come to another fork in the flow road. Is there an existing opportunity? On the canvas, add a decision element. This element will check to see if we made a selection in the lookup field. Name the outcome OpportunityNull, and leave Default as-is.
The logic is as follows: OpportunityLookup > Record ID Is Null = True.
Now we have two branches. Let’s work on the default outcome, aka an existing opportunity branch first.
Add a create record element. In this branch, we’ll create a quote. We’re only creating one record, so set the records to one, select the Quote object. Then map the fields from the screen and the contact.
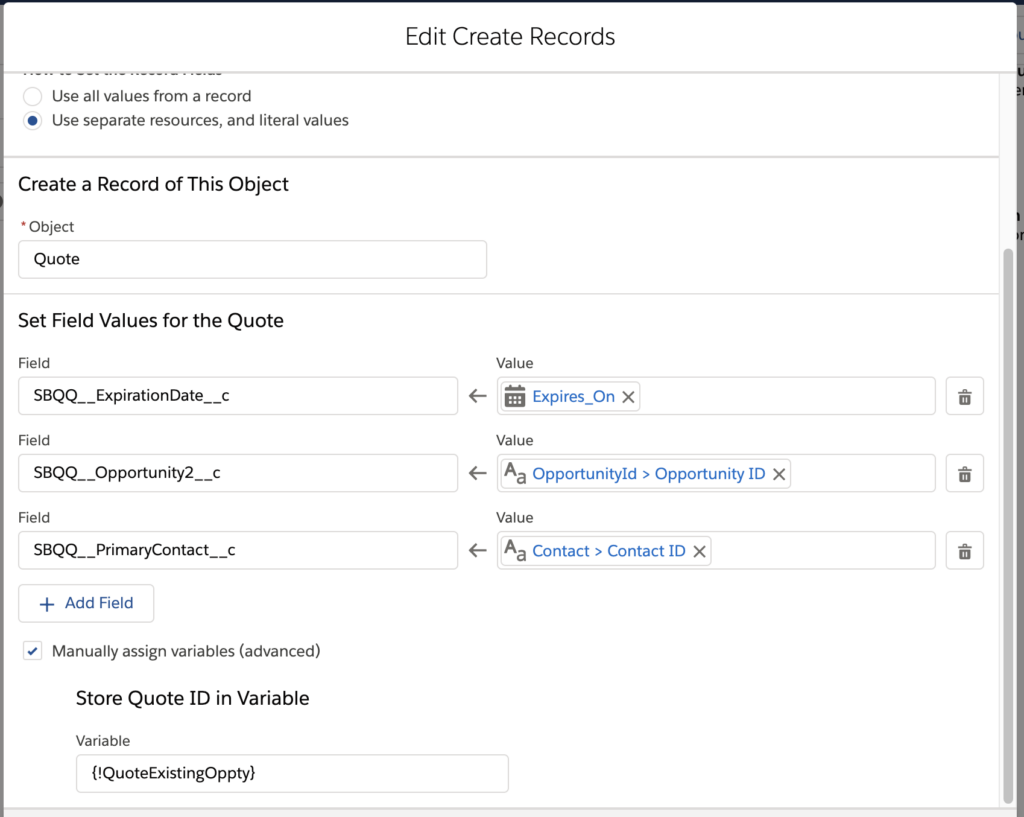
Store the Quote ID in the variable QuoteExistingOppty. Again, you can rename these variables to your liking.
Then add an action element after creating the quote and name it “Open Quote.” In the Set Input Values section, enter QuoteExistingOppty.
Almost there!
In the opportunity null branch, we’ll create an opportunity first, then a quote.
Add a create record element. Select the opportunity object. Map the values as follows.
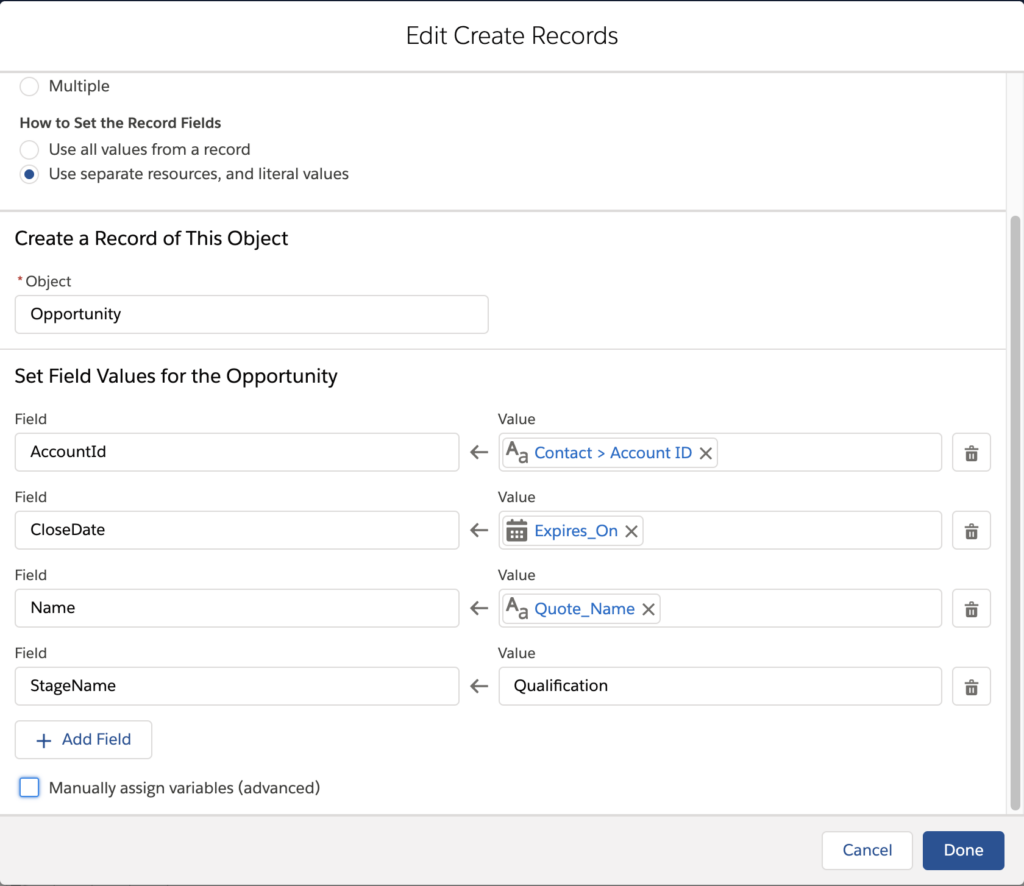
Since we’re not opening the opportunity after creating this, there’s no need to capture the opportunity ID. We’ll do that with the quote ID.
Back on the canvas, I’d recommend copying the Create Quote element we created and paste it after the create opportunity element. The only thing to change is the ID to be something like CPQQuoteID.
You can probably make this branch more elegant than I have it. After creating each quote, you could merge the paths together and have one open quote action. The only difference is this would require you using a consistent ID in both the create quote actions. Food for thought.
Deploying the Flow
Now your flow is ready to rock and roll. Save and activate the flow.
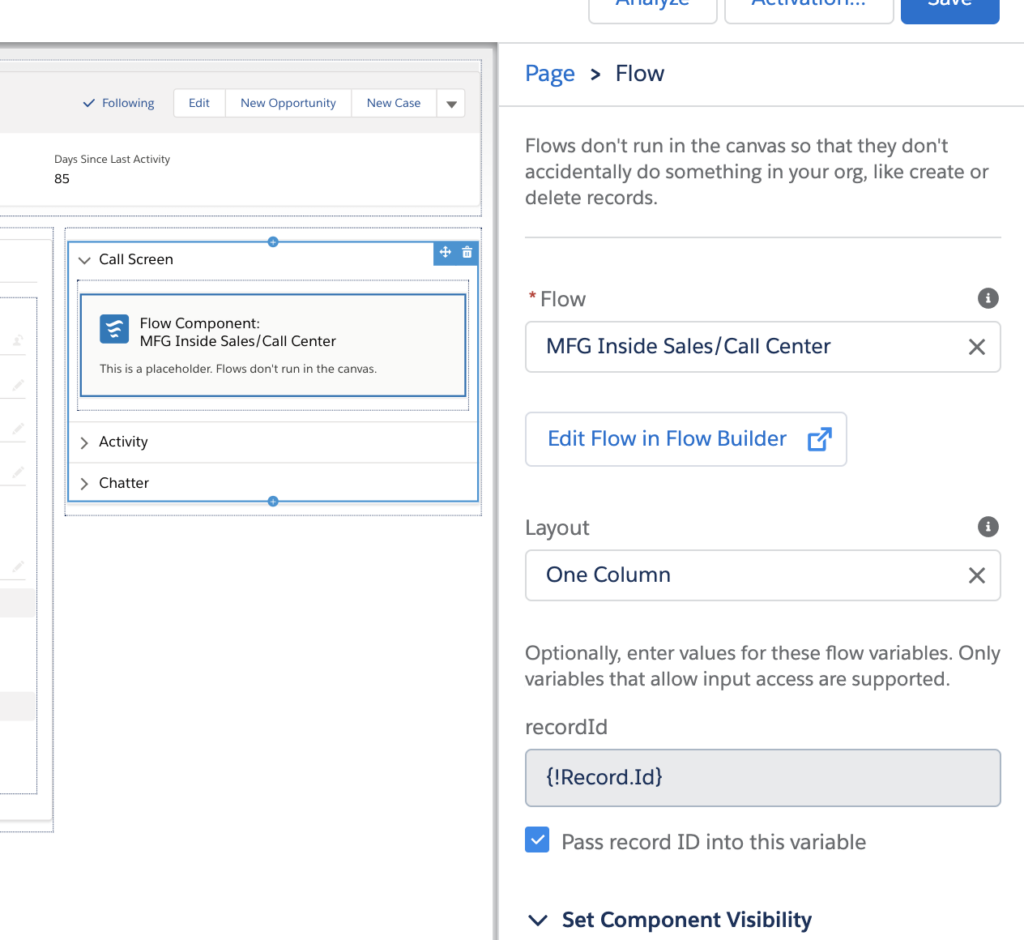
Go to your contact page, edit the page, and add a flow component. Select your flow and make sure that the checkbox “Pass Record ID into this variable” is checked. Save the page and you should be good to go!
I know this was a long post, but this is a great use case on how flow can really help users get to the information they need really quickly. I really like building this flow because it teaches you a lot of good concepts that can be repeated and applied to other flows you want to tackle.