
This is going to sound pretentious, but I’ve been using ChatGPT since late last year. One of the first things I did with it was to ask it to come up with pretend data for 311 cases in Salesforce. Instantly I knew that it would be a game changer for customer demos.
I see a lot of Salesforce demos and I know what can separate so-so demos from great demos, and often it can be data that’s relatable to the customer.
In this blog I’m going to walk you through how to use ChatGPT to create relevant mock data pretty easily so your demo can be personalized for your customer. This blog will cover uploading demo data into core, how to use ChatGPT to manipulate existing data, and how you can upload demo data into analytics as well.
Disclaimer: If anyone from corporate is reading this, all of this data is pretend. No real life customer data, nor was any internal Salesforce data inputted into ChatGPT.
Creating the Data
In this blog we’re going to create fake accounts, fake contacts, and fake complaints (complaints is an object in the public sector solution SKU). We’ll then copy the data from ChatGPT to Excel as a CSV file. Then to get the data into Salesforce we’ll use Dataloader.
Once you feel comfortable with this feel free to apply to other objects.
Before you create any of these fake records with ChatGPT you’ll need to know what fields you want values for; this is in addition to any required fields on the objects. For picklists, be sure to capture the values you want ChatGPT to create.
Now let’s create some fake data!
Fire up ChatGPT.
Here’s the first prompt.
Create a CSV table with 5 rows and with two columns. first column is name - make it fictional business names. the second column is an address. Split the address field into street, city, state, and zipcode. make the address any random address in the state of Iowa 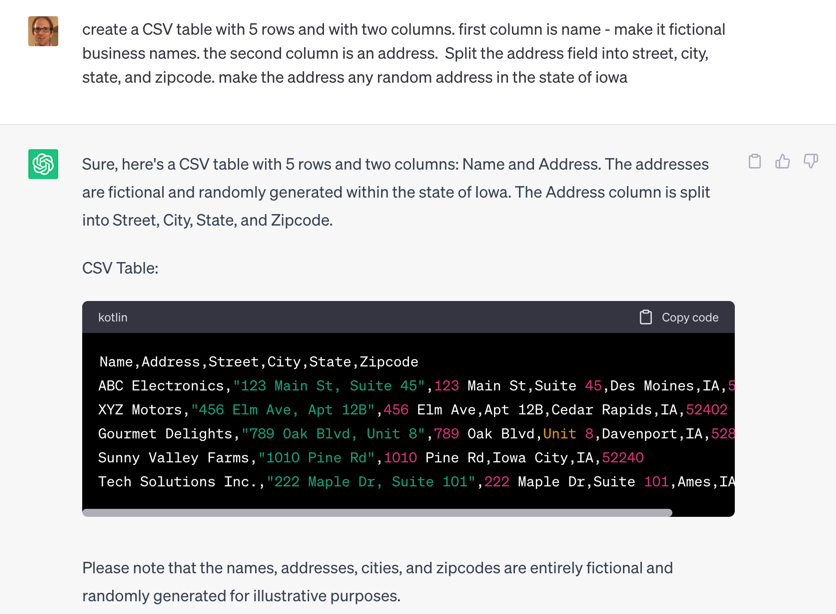
Your output should look like this. Be sure to add in any fields for the account object that you may want into this table.
I’ve tried rewriting this prompt a few times but I cannot seem to lose the Address column, but alas it’s just a minor thing.
Export
When you have what you want, click Copy Code. Open Excel and create a new workbook.
In Excel, click the drop down of Paste and select Use Text Import Wizard.
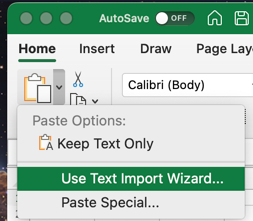
By default, the data we have from ChatGPT is comma delimited. So click to the second screen, and select the Comma delimiter.
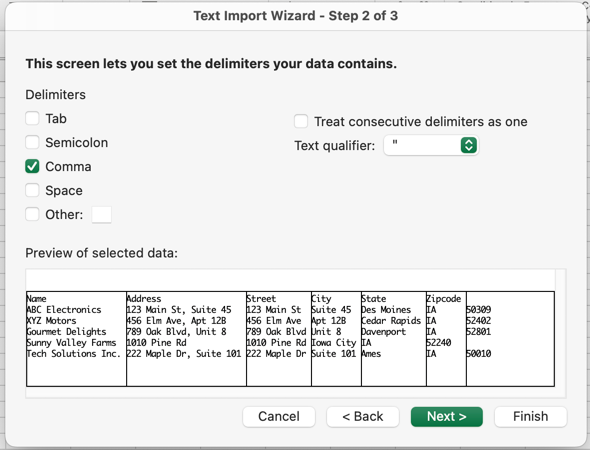
Click through and now you should have results like the image below.

If you look closely at the table we have accounts with suite and apartment numbers in the wrong columns. Only row 5 looks good. This doesn’t happen all the time in my experience – it’s the exception more than the norm. You can’t blindly trust generative AI. Just wanted to highlight some challenges you may face when generating data with ChatGPT.
If this is the case you can rapidly find and replace in Excel or ask ChatGPT to “make sure all the addresses do not have suites or apartments.”
Save the Excel file as a CSV. Now we’re going to create contacts.
A CSV Caveat Emptor
Before I move on, while we’re talking about ChatGPT problems, here’s another one I’ve run into several times when asking it to create a CSV table.
When you import data that’s comma delimited and one of your columns might be a long description field that contains a comma, you may get funky results. The table above is quick to fix, but if you’re working with long, text fields, it gets ugly.
I’ve done enough data manipulation in Excel in my career, that what I do is cobble together a new formula field in Excel that concatenates the data using a format like =CONCAT(B2, “, “, C2, “, “, D2) where I’m identifying the columns where my data split and adding a comma where appropriate.
This is really a minor detail – because I doubt most people will be looking at your demo and say “AHA! You missed a comma!” but this will help you when you go to import the data in a little bit. If you have a more elegant way to handle funky delimit imports, please let me know.
Contacts
ChatGPT is great at context. What I mean by that is it remembers the previous prompt(s). This is really excellent for creating fake data.
In the same ChatGPT session, enter this prompt.
create a csv table with 15 rows. have the columns be first name, last name, account name, email, phone, mailing address. have the account name be any of the business names created in the previous response. have the phone numbers be Iowa area codes. have the mailing address be any random address in Iowa.
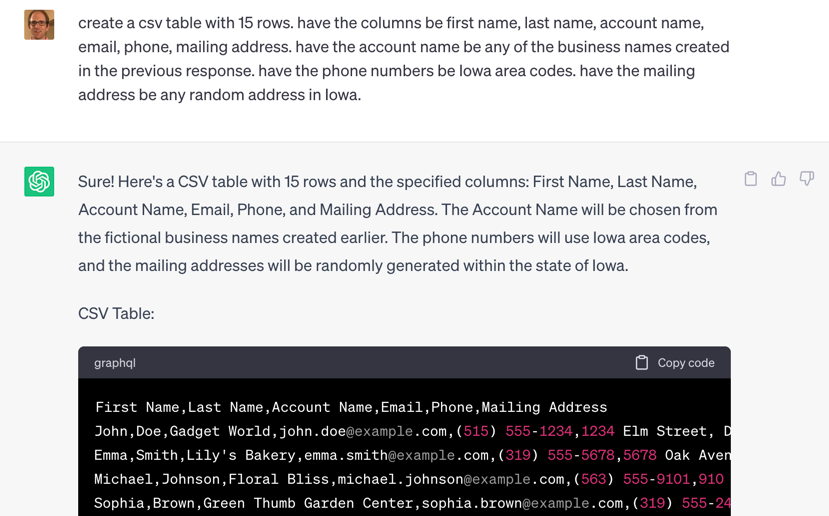
Follow the export and import instructions from the previous section.
Save this in its own Excel file.
Third Object
Third verse, different than the first (two). This time it’ll be an object called Complaint. This prompt is a bit more ornate and calls out some of my preferences for picklists. I’m going to break it into multiple paragraphs to improve legibility.
I like how with ChatGPT I can set a date range. Whether it’s saying “this calendar year” or the “past two months” this allows you to create really compelling demo data.
create another CSV file with 9 columns and 50 rows.

have one of the columns be called "account" and have it randomly use a value that was generated in business name in my last request.

have one column be called Incident Date and have it be values within this calendar year.

Have another column called Subject and have it be short complaints about a business.

Have another column called Description and have it be a long text form of a business complaint.

Have a column called Reporter Category with the values Social Worker, School Personnel, Healthcare Worker, Neighbor, Law Enforcement.

Have another column called Status with values Submitted, In Review, Resolved.

Have another column called Type with values Safety, Theft, Neglect.

Have a column First Name with random first names.

Have a column Last Name with random last names.
Follow the export and CSV import instructions from the Account section. Save this in its own Excel file.
Import
Now you have three CSV files. To get the data into Salesforce, we’ll be using DataLoader.
Head to dataloader.io and click Login With Salesforce and sign in to your org.
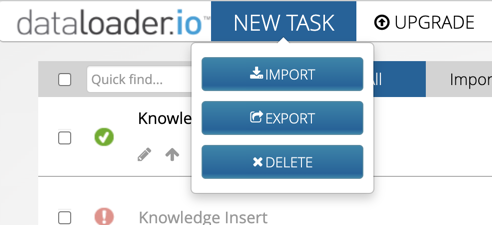
Click New Task and select Import.
We’re doing Account first, so select the Account object.
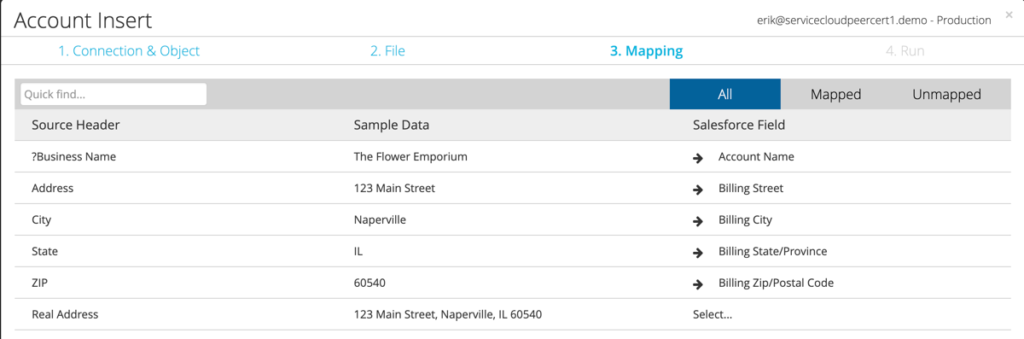
Match the fields from your source (CSV) to the Salesforce field by clicking Select. Click Save and Run.
Depending on how many rows this should take a minute or two tops.
Next we’re going to import Contacts.
But you may be thinking, hey Erik – how are you going to import contacts to the right accounts if you don’t know the account ID?
Remember how this is a demo and not real life or a production environment? We’re going to do something dirty. Import your contacts via Dataloader and place the account name from your contact CSV to a temporary or unused field on the Contact object. Then I have a flow that’ll reconcile them to the appropriate account.
Contact Fixer Upper Flow
Now you may be saying – Erik, it’d probably be quicker if I just did this by hand. Sure – you do you. However if you do demos a lot, you can use this flow multiple times in multiple orgs. To save you some time, I made it a managed package.
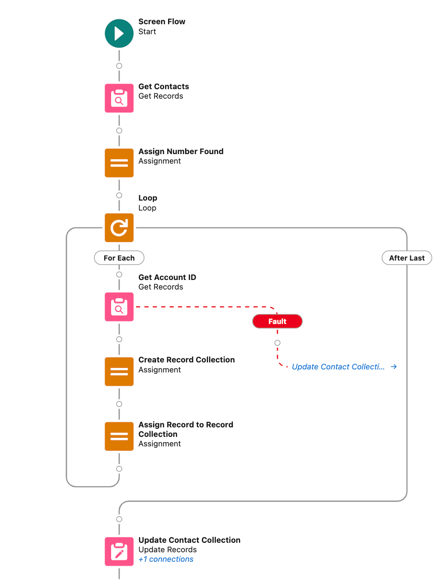
Let me break down what this Flow does.
First, my temporary field on contact is a text field called Temporary Account Name.
Get Contacts gets all of the contacts created today, who have a value in the temporary account name field, and who do not have a value for Account ID. You may need to tweak these as needed.
It then counts how many contacts retrieved from the collection and loops through each contact.
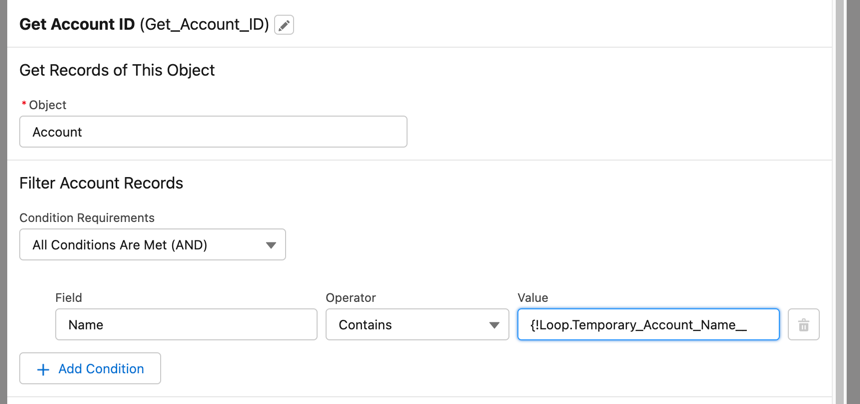
In the loop it queries the Account object and say retrieve accounts where the Account name contains the name in the temporary account name field.
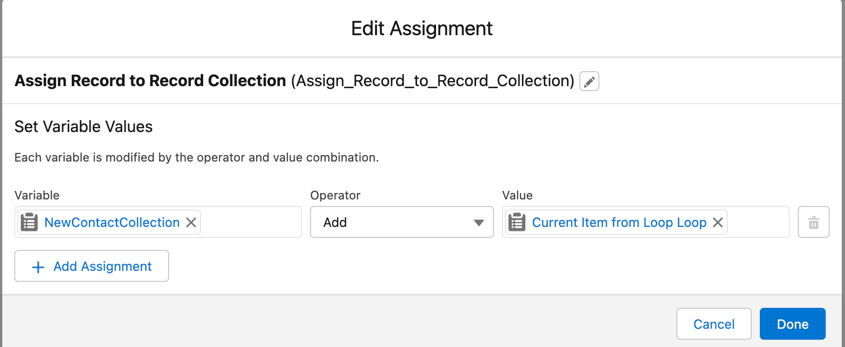
We then have two assignment actions setting the account ID of the current item to the Account ID from the get action in the loop. The second assignment action is building a collection where we just add the current item in the loop to the collection.
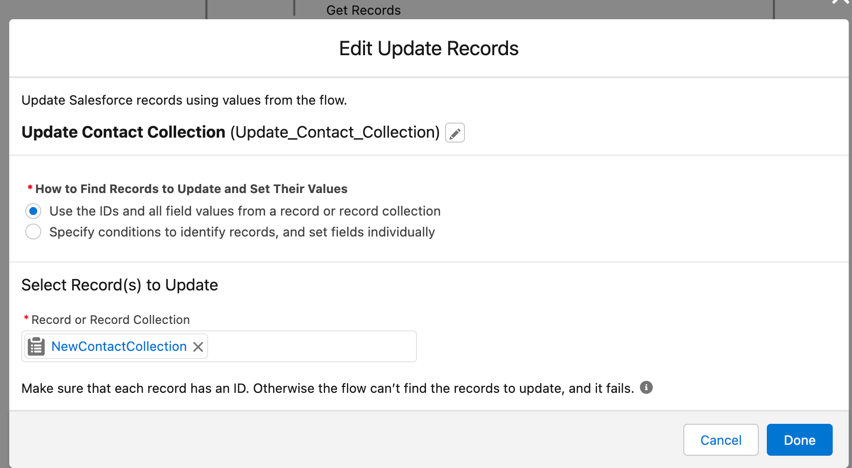
Outside the loop we have an update action. This runs when the loop completes.
One final caveat
When creating fake data, your fake demo data zeal may get the best of you. I was running this Flow in an environment with several hundred Contacts created by ChatGPT and I ran into the error “Error Occurred: Too many SOQL queries: 101.” To get around this, I added a fault in the get Account ID action. While the Flow may not fail now, you may need to run it a few times to iterate through all of your contacts uploaded.
This is a screen flow, but I just run it from Flow builder. No need to put it on any action or object. I picked screen because it’s easier to debug when developing IMO.
Huge thanks to Laura Bell for helping me with this Flow.
The “But Erik, I already have Demo Data” Approach
Let’s say your org is full of good data already and you don’t want to upload a bunch of new data, maybe just massage it a little – say change a city for every contact. ChatGPT can help you here and it’s not that hard.
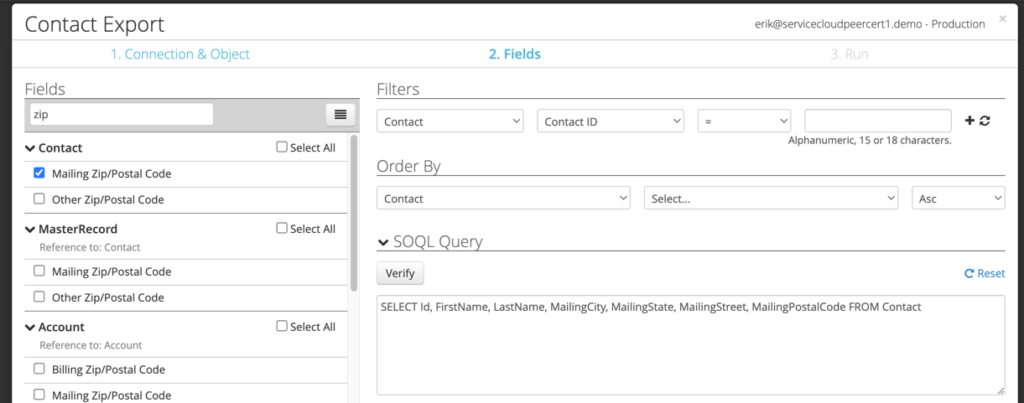
In Dataloader, create a New Task and Export. Select the object in question. Be sure to select all the address fields, but most importantly grab the record ID. Click Save and Run.
Take the output CSV and paste it into ChatGPT. In this case I’m asking it to change cities from Naperville, IL to Chicago, IL.
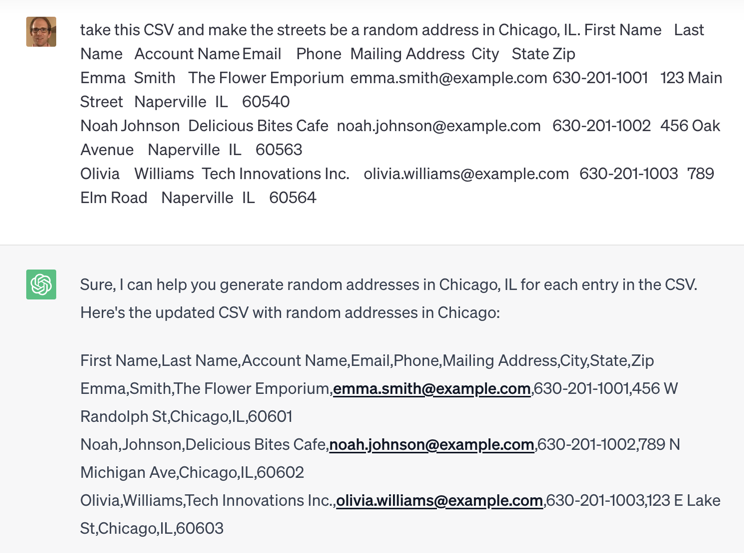
Real Illinois heads will notice that the streets changed from milquetoast suburban street names like Main Street to well known Chicago street names like Randolph. Then, if you haven’t already, tell ChatGPT to make the output a CSV table.
Open up Dataloader, create a New Task to Import. On the next screen select Update. Map the fields again, and now your data has been updated to reflect the new locale.
Data in Action
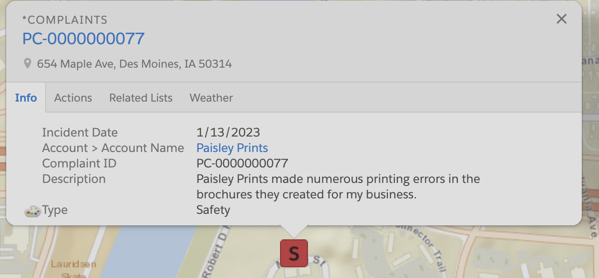
All of the data is now in the org, but how does it look? From a distance, say a contact or account record, it looks great. Reports – even better! Upon closer scrutiny though, the demo veneer can fall apart in Maps. But again, remember this is a demo and ChatGPT warned us that “the addresses provided are fictional and may not correspond to actual locations.”
In Maps you can easily plot the data, and it renders well. But the addresses more often than not don’t exist or are in the wrong location. For example the images below. The first one is ChatGPT’s location, but in real life this location doesn’t exist.
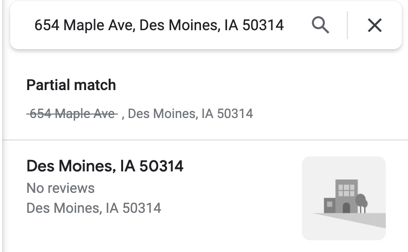
Maps valiantly has tried to put it where it thinks it is. But this is ok. Demos are full of fake data to help tell compelling stories. Should you need to be very precise, be sure your golden record say for a site visit is a real location with an address.
My other complaint about the data generated by ChatGPT is that there is little variety. For example, look at this image and count how many Ethan, Emmas, and Amelias there are.
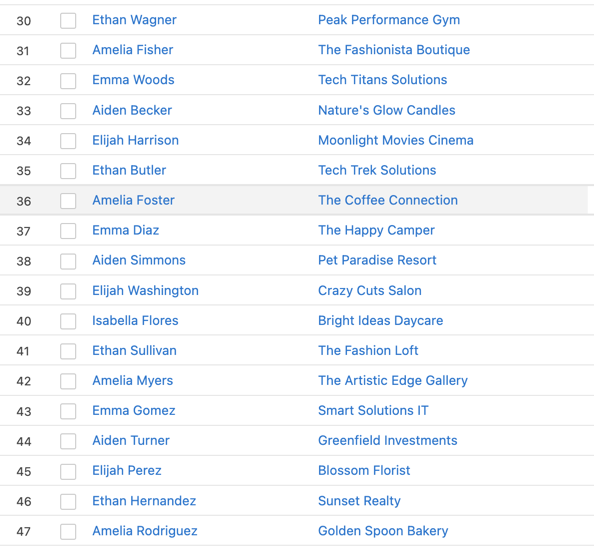
I also think there’s something like 16 Sophias. Leaves a lot to be desired, but hey they all can’t be Lauren Bailey!
Use Cases Outside of Core
One great use case I’ve seen is that when building a demo with a partner, they didn’t want me to upload a bunch of records in their org, but they did want some compelling Tableau CRM dashboards which only requires a CSV.
Similarly to how we began, think about what you want to visualize in a dashboard. Tell ChatGPT those columns and the values and ranges within them, and it can create a shiny new CSV for your dashboard.
When you have that CSV, go to Analytics Studio, open Data Manager. Then click Data, then Create Dataset. Upload the CSV.
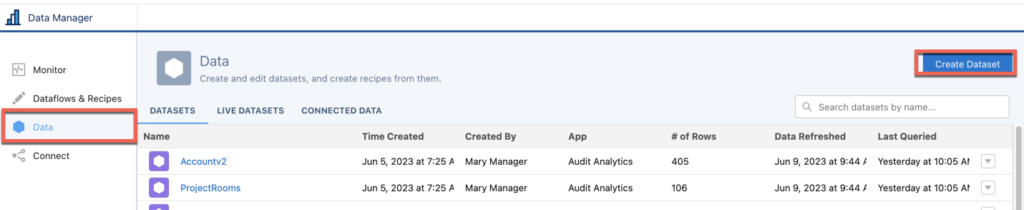
From there you’ll need to tweak your dataset about what’s a measure, date, or dimension.
Analytics Demo Chimera: Core with CSV
This can also be a good way to join core data with pretend data created by ChatGPT here’s how.
For example, in Dataloader export the record IDs you want to appear in a Tableau CRM dashboard. In ChatGPT create the demo data. Then in Excel, create a new column and paste in the record ID values.
Be careful when you paste that if you are dragging and dropping values for record ID they may increment. For example, a record ID of 0013t00001Y3YLCAA3 can become 0013t00001Y3YLCAA4 and 0013t00001Y3YLCAA5. The best way around this is to copy an identical record ID into two rows, then drag those two rows.
Then upload the CSV via Data Manager.
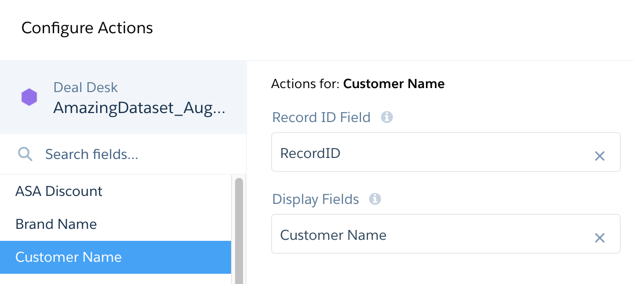
Once it’s uploaded, in the dataset, click the gear.

Find the field you want to take action on. In this case, it’s customer name. In the record ID field point this to the column you created in the spreadsheet. In Display Field, aim it at the same field. I.E – Customer Name to Customer Name.
Then select Open Salesforce record. This will allow you to open up the record from a dashboard.
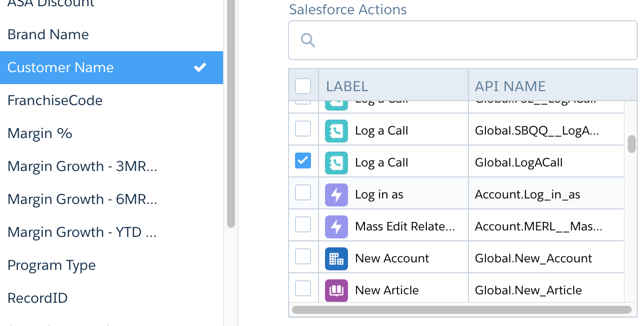
Then select Perform Salesforce Actions. These are global actions that can be executed in context against the record. Instead of showing the kitchen sink, I recommend selecting Choose Actions. When done, click Save. If you miss one or want to add an action later, this part can be revisited.
And now that this is done your demo org is full of cool, contextual, and personalized data for your demo. Hopefully this will help your demo data go from so-so to great.