
When I think of drudgery, I think of this classic bit from “Mr. Show.”
If you’re too lazy to watch the clip, basically if mustard and mayonnaise were in the same jar you’d save up to five minutes on your life over 30 years. That’s great ROI!
Renaming records is a chore. What if there was a way you could easily and rapidly rename your records in Salesforce? That’s right, there is a better way. Introducing Erik’s Rapid Record Renamer Flow™️. In this blog I’ll walk through this flow which rapidly renames an account and all the opportunities associated to an account. By taking the concepts here, you can apply them to any object in Salesforce.
When it is finished, it’ll look like this for the user:
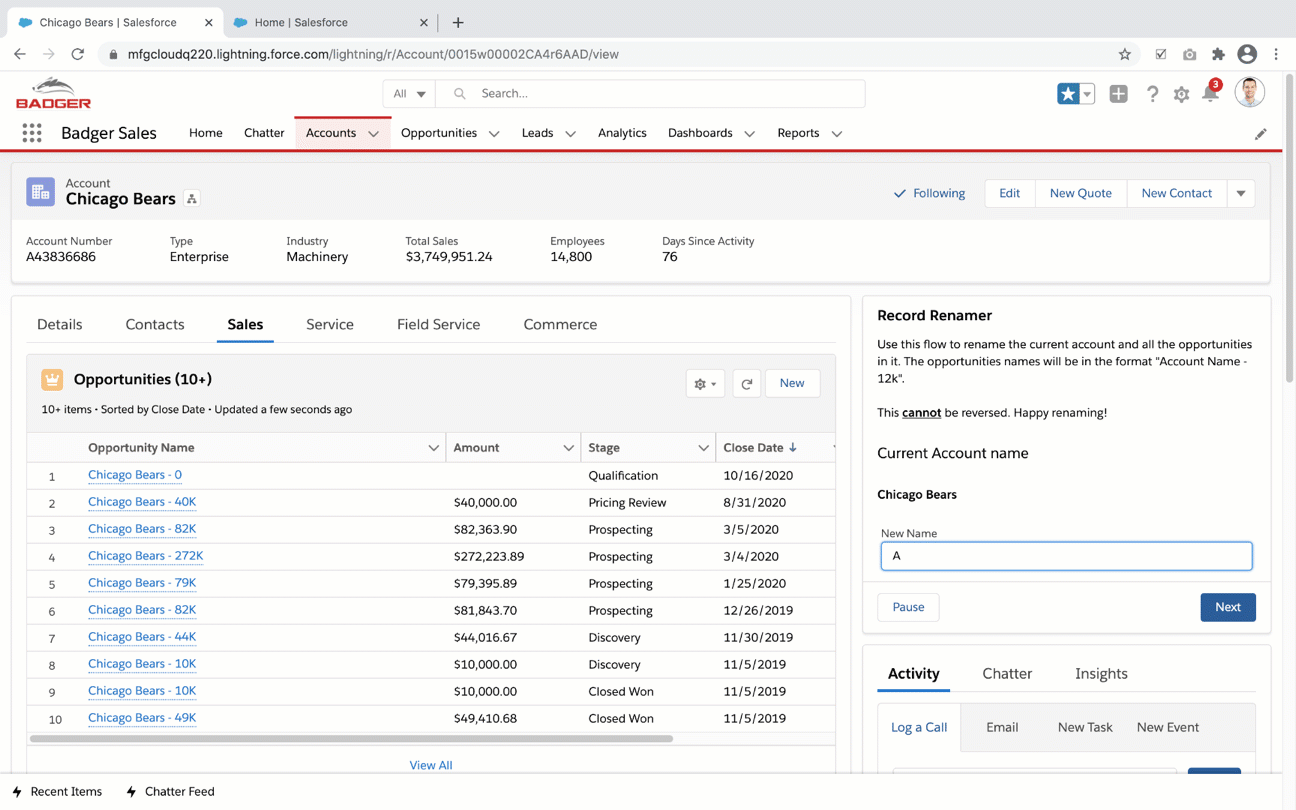
All opportunities will be renamed in a consistent naming convention.
And the flow will look like this on the backend. Nowhere near as complex as my last post.
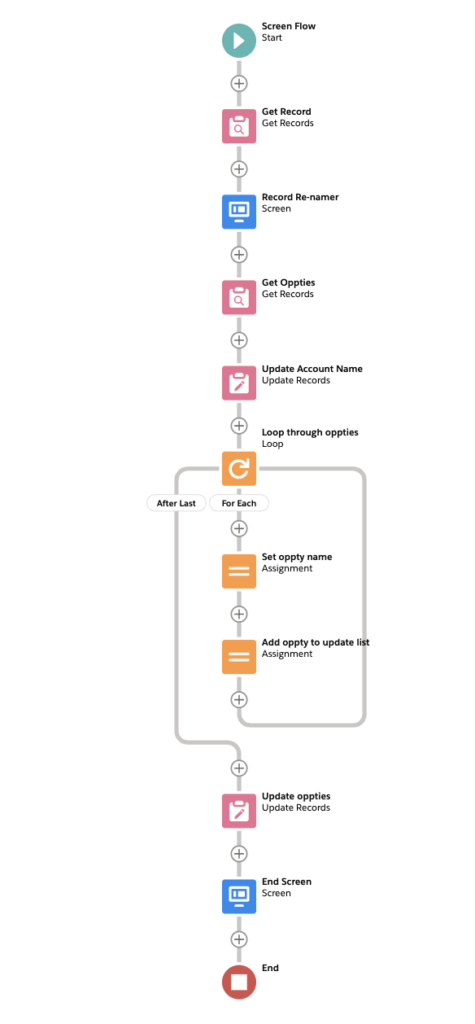
I have some grander ambitions for this flow, but this is V1.
Let’s begin.
This flow will run on the Account object and it will be a screen flow.
Before we build a flow, we need to create two fields on the opportunity. I ran into some obstacles trying to handle some logic in the flow with a formula about how to rename my opportunities. I found the best way, at least in this V1, was to create fields on the opportunity and reference them in my flow.
On the Opportunity object, create a new formula field and call it Round Formula. Set the formula to be ROUND(Amount,0). This will remove any decimals from the opportunity amount.
Then create another new formula field and call it Name Formula. We’re going to take the value from Round Formula and format the new opportunity name in this field. The formula is as follows:
IF(LEN(TEXT(Round_Formula__c)) >= 10,
Mid(TEXT(Round_Formula__c/1000000000), 1,3)+'B',
IF(LEN(TEXT(Round_Formula__c)) >= 7,
MID(text(Round_Formula__c/1000000), 1,3) +'M',
IF(LEN(TEXT(Round_Formula__c)) >= 4,
TEXT(Round(Round_Formula__c/1000,0))+'K',
IF(LEN(TEXT(Round_Formula__c)) >= 3,
TEXT(Round_Formula__c/1),TEXT(Round_Formula__c)))))
I must confess there is probably a more elegant way of doing this, and possibly getting it down to a single formula field, but again, this is a V1 version of the flow.
Now that we have the fields in place, we can start working on the flow.
Create a new flow, and make it a screen flow.
Add a Get Record element. Select Account. This next part is verbatim from another post of mine.
Set the Filter Account Records to be ID equals recordID
What?! RecordID isn’t there? That’s because RecordID is a variable and we need to create it. This will allow us to pass in the record ID from the contact to the flow and filter everything accordingly.
In the Value box, click and select New Resource. Then set Resource Type to Variable, API name to recordID, data type to Text, and most importantly make this available for input. If you do not have that last part, the flow will fail.
When done, make sure that the value is set to RecordID.
Scroll down a bit and select Only the first record. In the How to Store Record Data, we’re going to choose the fields here. This is really up to you.
</verbatim >
In this flow, we’re just storing two variables so it feels a little more nimble than grabbing the kitchen sink.
Create a new variable named originalAccountName. Map it as follows.

Now add a screen element to the canvas. On this screen, I put a display text component telling end users what to expect when this flow is run.
My caveat says the following: Use this flow to rename the current account and all the opportunities in it. The opportunities names will be in the format “Account Name – 12k”.
This cannot be reversed. Happy renaming!
Once you’ve inserted your caveat emptor, add two display text components. In one, enter the text “Current Account Name.” In the other, set the text to be the resource {!originalAccountName}. This will display the current account name on the screen.
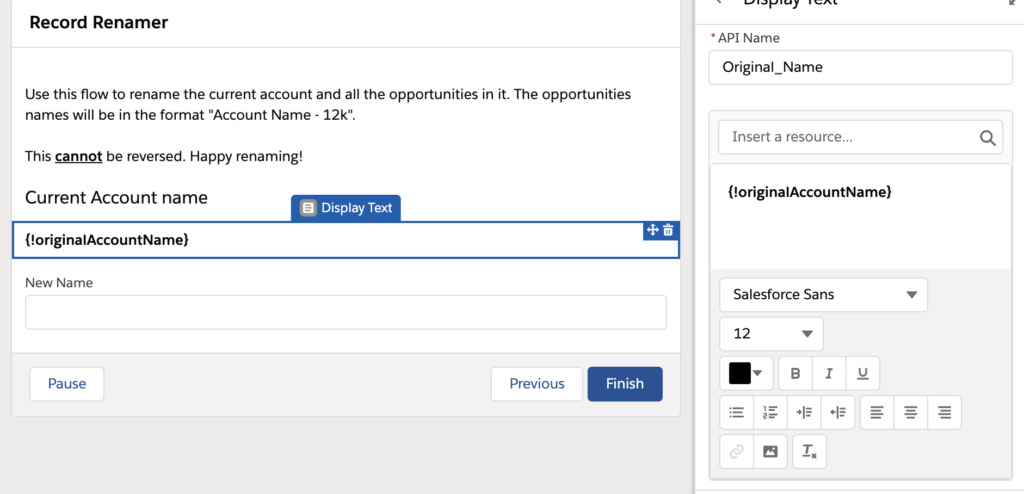
Then on the screen, add a text component. This is where you will enter the new name for the account. Name the component New Name. We’re now done with the screen.
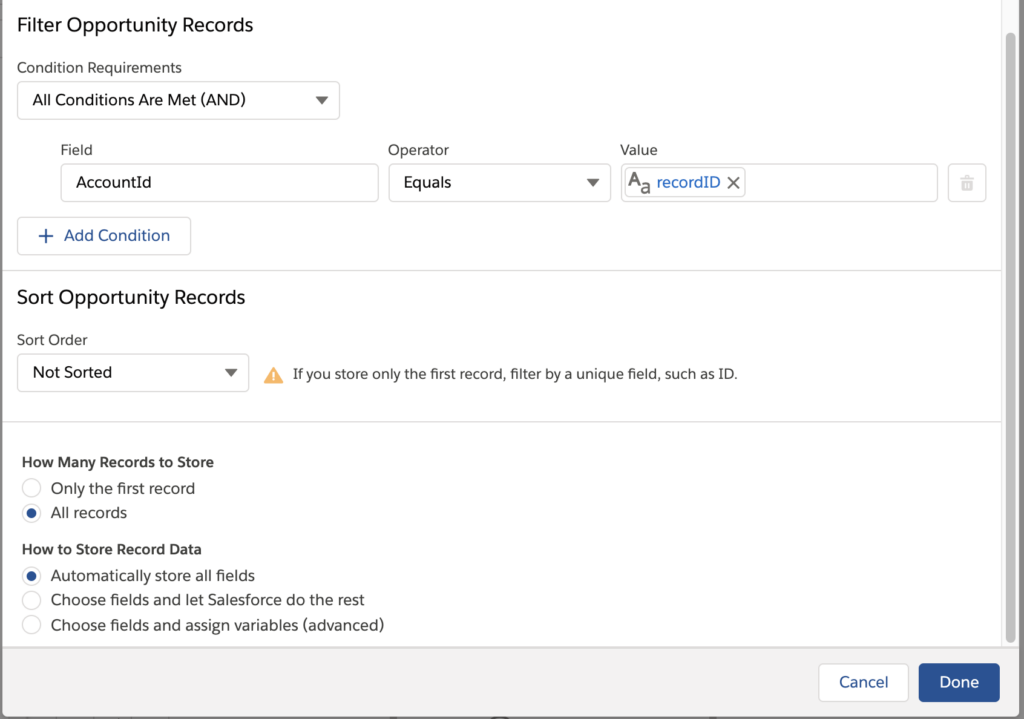
Now we’re going to get the records we’re going to rename, which in this case are opportunities. Add a Get Record element. Select the Opportunity object, and filter it so you only get opportunities on the current account. This is done by setting it so AccountId equals recordID.
Then scroll down and select “All Records” and “All Fields.” The reason I choose to store all fields here, is in the future, when iterating through all of the opportunities, I may want to update more than just the name, so this is a little bit of future proofing on my part. Again, it’s up to you in regards to what you want to do.
Now that we have the new account name and all the associated opportunities, let’s start renaming stuff.
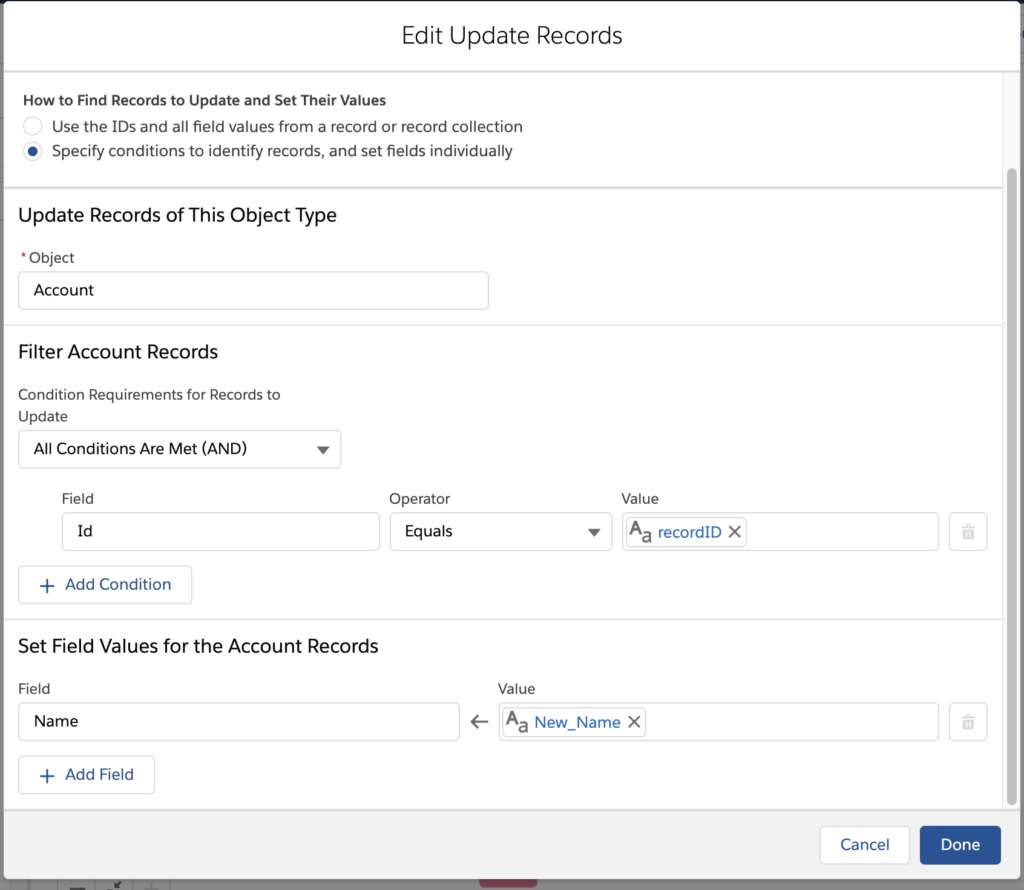
Add an Update Record element. First we’ll update the account name. Set the element to wok on Account and filter it to Id equals recordID. Then map the value for Name to New_Name.
Congrats! We now have one record that has been renamed.
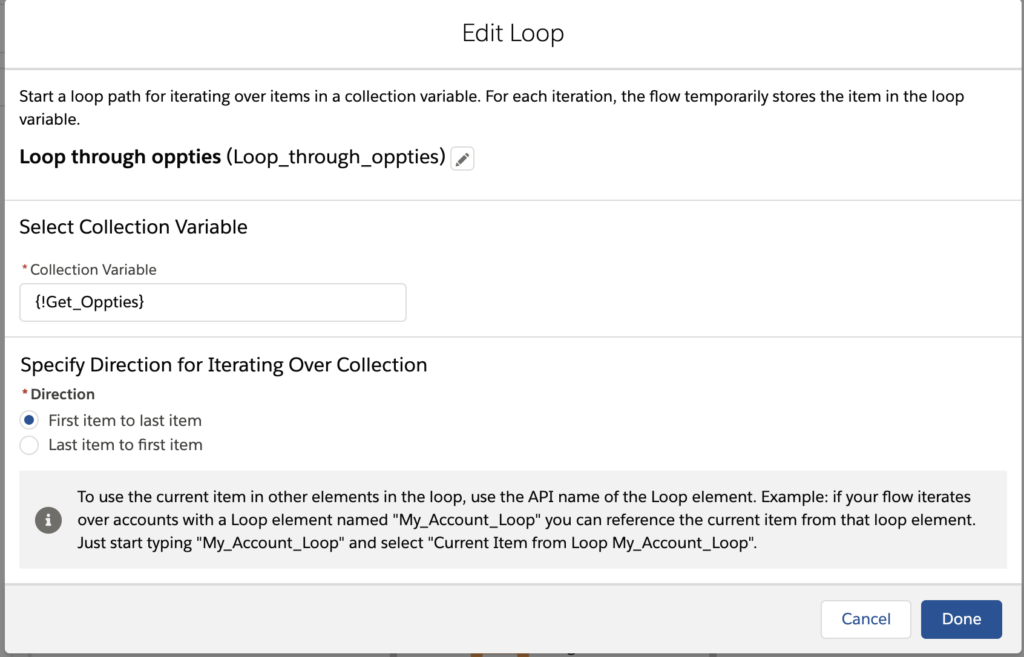
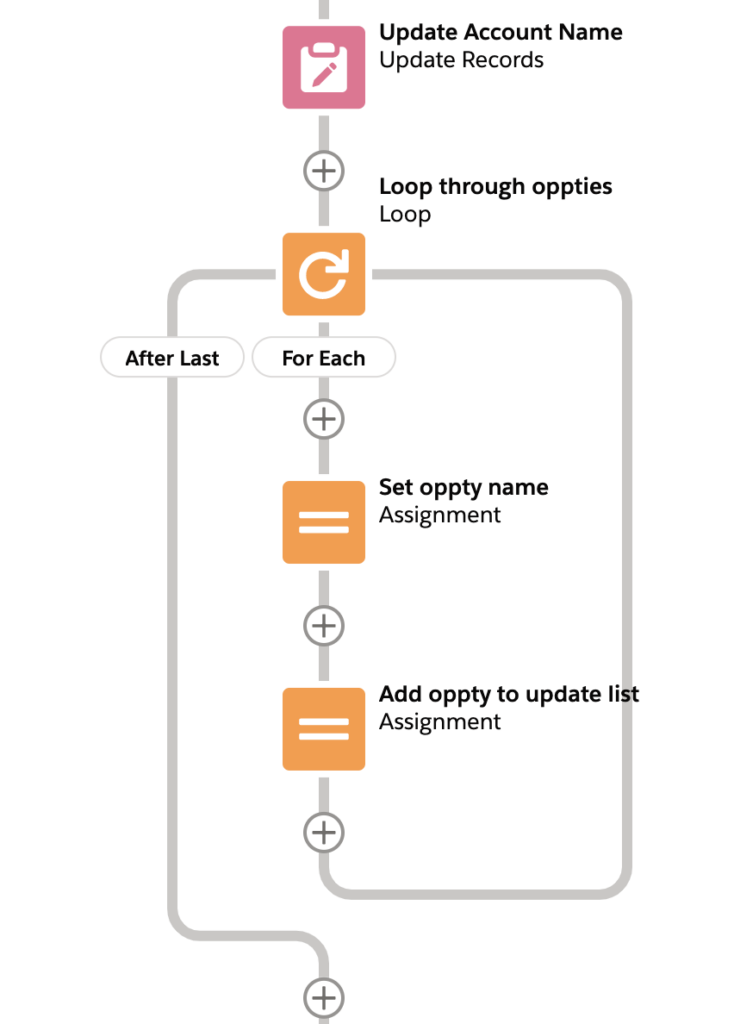
Now it’s time to get wild. Add a Loop element on the flow canvas. What we’re going to do now is go through all of the opportunities we queried earlier.
In the flow element, set the collection variable to whatever you named the Get Opportunities element. In this case, {!Get_Oppties}.
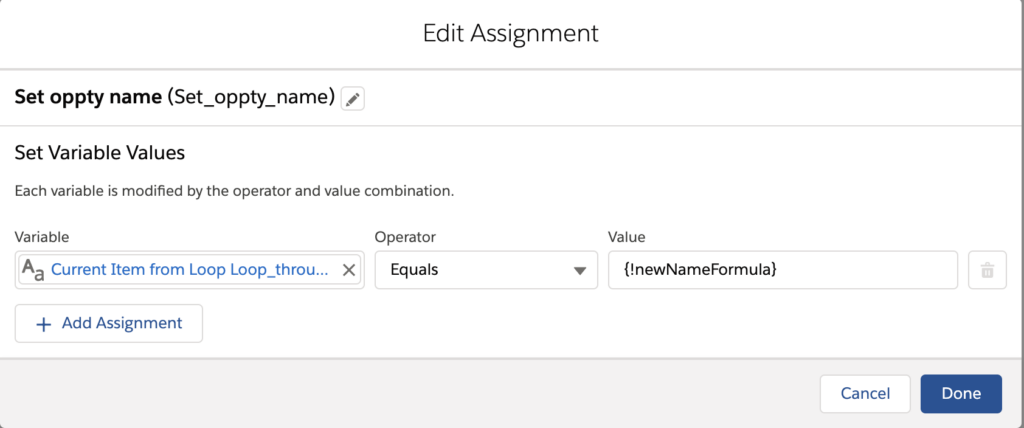
Within the loop, add an Assignment element. In this element, we’ll change the opportunity’s name.
Variables look a little different now that we’re in a loop. Check it out.
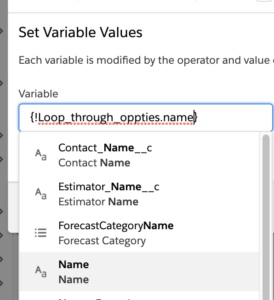
Basically we have an array or collection of variables and now you can specify which field you want to update. Select Name and then set it to equal {!newNameFormula} aka the field we created at the beginning of this blog.
Then add another assignment element. This element is a little different than the last assignment because in here we’re essentially counting opportunities and when we reach the limit, we’ll exit the loop, and then update the names en masse.
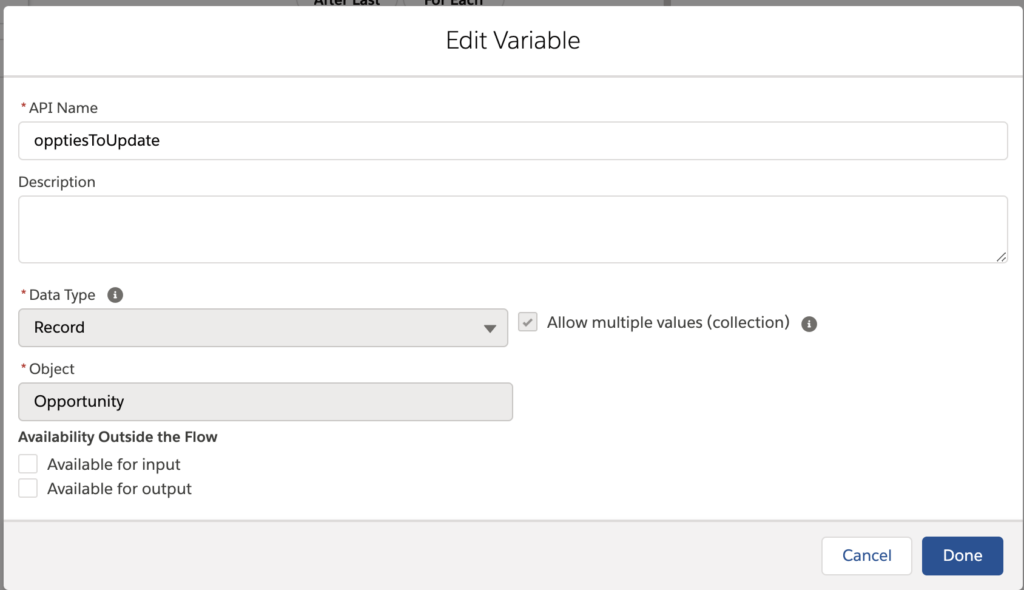
To do this, create a new variable called opptiesToUpdate. Give it a data type of Record and the Object is Opportunity. Be sure to allow multiple values.
In the assignment element, set the variable to opptiesToUpdate, set the operator to Add, and the value is {!Loop_through_oppties} (aka the name of the loop). The flow should look like this now.
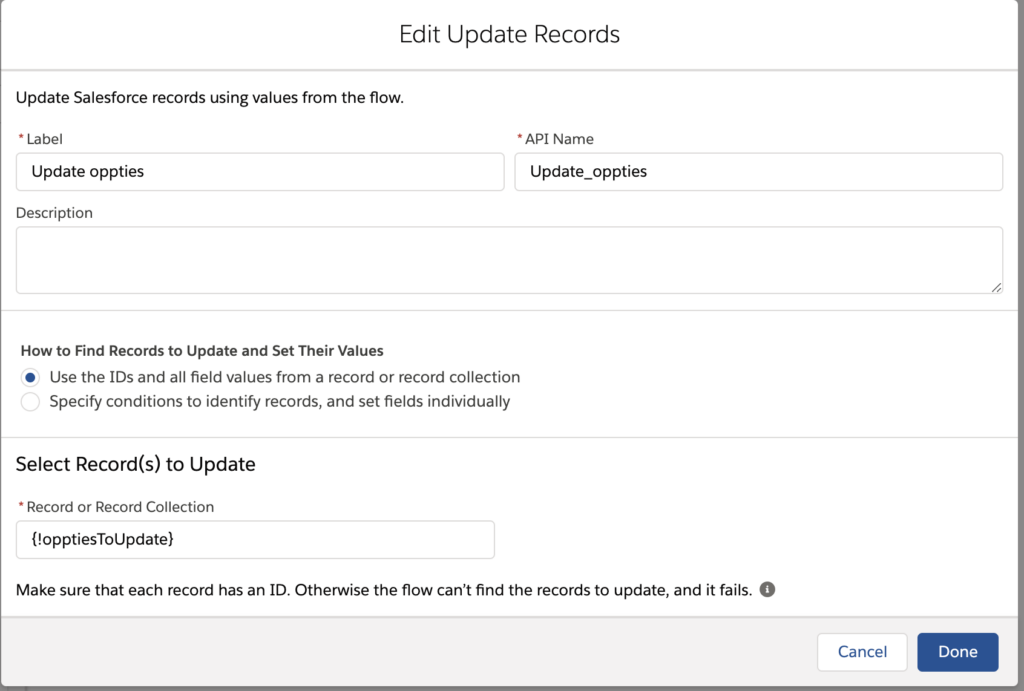
Almost there. We have stored all the names for the opportunities, but we have not renamed them. As much as I would like the update action to be in the loop, I could not make it work. But there’s a bright-side: by gathering everything into a collection, we can update many records at once with a single update records element.
Beneath the loop, in the After Last branch, add an Update Record element. Name it “Update Oppties.” In how to Find Records, check “Use the IDs.” Then enter {!opptiesToUpdate} in Select Record(s) to Update.
Cool. Everything is updated! To let the end user know that everything is done, I recommend adding a screen telling them as such.
Deploying the Flow
Now your flow is ready to rock and roll. Save and activate the flow.
Go to your contact page, edit the page, and add a flow component. Select your flow and make sure that the checkbox “Pass Record ID into this variable” is checked. Save the page and you should be good to go!